Combine 框架,从0到1 —— 5.Combine 常用操作符
内容概览
- 前言
- breakpoint
- handleEvents
- map
- flatMap
- eraseToAnyPublisher
- merge
- combineLatest
- zip
- setFailureType
- switchToLatest
- 总结
前言
正所谓,工欲善其事,必先利其器。在开始使用 Combine 进行响应式编程之前,建议您先了解 Combine 为您提供的各种发布者(Publishers)、操作符(Operators)、订阅者(Subscribers)。
Combine 操作符(Operators) 其实是发布者,这些操作符发布者的值由上游发布者提供。操作符封装了很多常用的响应式编程算法,有一些可以帮助我们更轻松地进行调试,而另一些可以帮助我们更轻松地通过结合多个操作符来实现业务逻辑,本文将主要介绍这两大类操作符。
后续示例代码中出现的 cancellables 均由 CommonOperatorsDemo 实例提供:
final class CommonOperatorsDemo {

    private var cancellables = Set<AnyCancellable>()

}
官网文档:https://developer.apple.com/documentation/combine/publishers/print
print 操作符主要用于打印所有发布的事件,您可以选择为输出的内容添加前缀。
print 会在接收到以下事件时打印消息:
- subscription,订阅事件
- value,接收到值元素
- normal completion,正常的完成事件
- failure,失败事件
- cancellation,取消订阅事件
示例代码:
func printDemo() {
        [1, 2].publisher
            .print("_")
            .sink { _ in }
            .store(in: &cancellables)
}
输出内容:
_: receive subscription: ([1, 2])
_: request unlimited
_: receive value: (1)
_: receive value: (2)
_: receive finished
breakpoint
官网文档:https://developer.apple.com/documentation/combine/publishers/breakpoint
breakpoint 操作符可以发送调试信号来让调试器暂停进程的运行,只要在给定的闭包中返回 true 即可。
示例代码:
func breakpointDemo() {
        [1, 2].publisher
            .breakpoint(receiveSubscription: { subscription in
                return false // 返回 true 以抛出 SIGTRAP 中断信号,调试器会被调起
            }, receiveOutput: { value in
                return false // 返回 true 以抛出 SIGTRAP 中断信号,调试器会被调起
            }, receiveCompletion: { completion in
                return false // 返回 true 以抛出 SIGTRAP 中断信号,调试器会被调起
            })
            .sink(receiveValue: { _ in

            })
            .store(in: &cancellables)
}
您可能会好奇,为什么需要用这个操作符来实现断点,为何不直接打断点呢?
从上面的示例代码中,我们可以看出,通过使用 breakpoint 操作符,我们可以很容易地在订阅操作、输出、完成发生时启用断点。
如果这时候想直接在代码上打断点,我们就要重写 sink 部分的代码,而且无法轻易地为订阅操作启用断点。
handleEvents
官网文档:https://developer.apple.com/documentation/combine/publishers/handleevents
handleEvents 操作符可以在发布事件发生时执行指定的闭包。
示例代码:
func handleEventsDemo() {
        [1, 2].publisher
            .handleEvents(receiveSubscription: { subscription in
                // 订阅事件
            }, receiveOutput: { value in
                // 值事件
            }, receiveCompletion: { completion in
                // 完成事件
            }, receiveCancel: {
                // 取消事件
            }, receiveRequest: { demand in
                // 请求需求的事件
            })
            .sink(receiveValue: { _ in

            })
            .store(in: &cancellables)
    }
handleEvents 接受的闭包都是可选类型的,所以我们可以只需要对感兴趣的事件进行处理即可,不必为所有参数传入一个闭包。
map
官网文档:https://developer.apple.com/documentation/combine/publishers/map
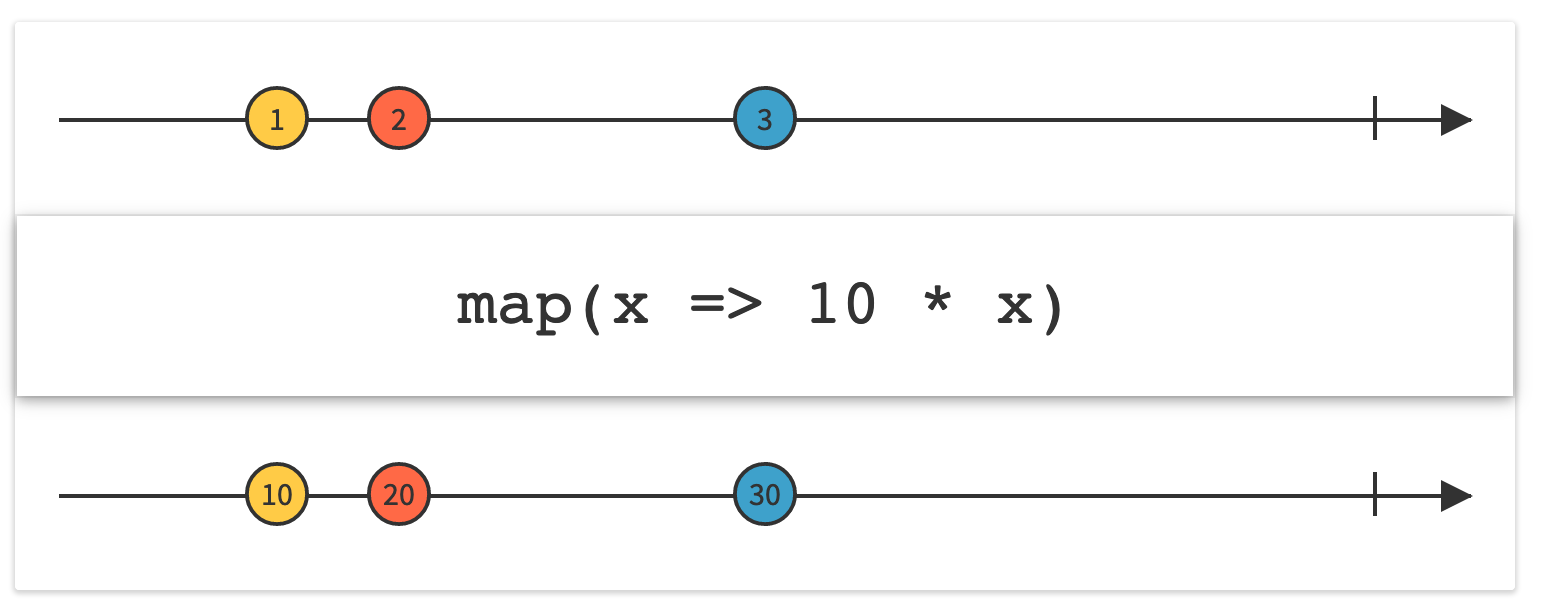
map 操作符会执行给定的闭包,将上游发布的内容进行转换,然后再发送给下游订阅者。和 Swift 标准库中的 map 函数类似。
示例代码:
func mapDemo() {
        [1, 2].publisher
            .map { $0.description + $0.description }
            .sink(receiveValue: { value in
                print(value)
            })
            .store(in: &cancellables)
}
输出内容:
11
22
flatMap
官网文档:https://developer.apple.com/documentation/combine/publishers/flatmap
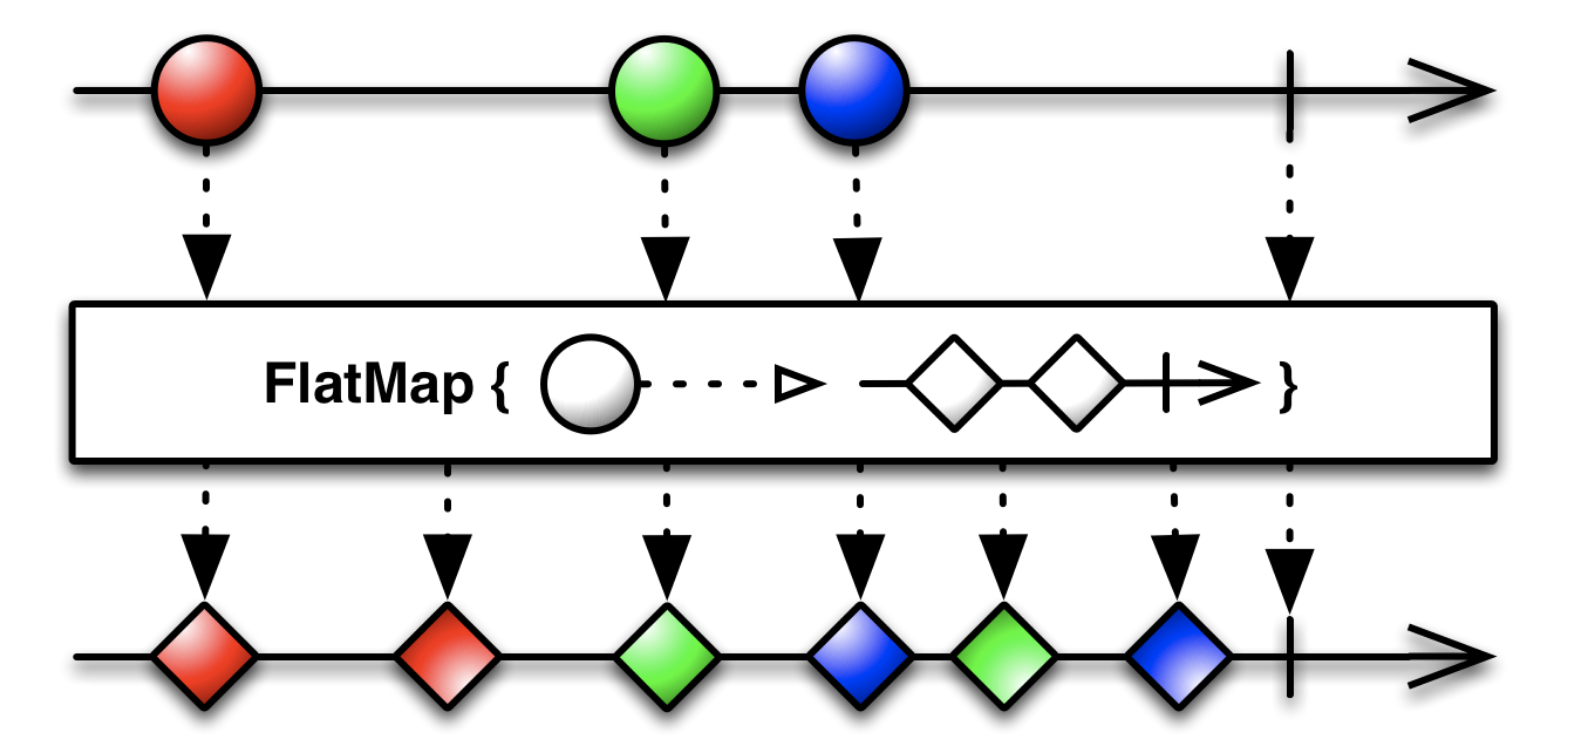
flatMap 操作符会转换上游发布者发送的所有的元素,然后返回一个新的或者已有的发布者。
flatMap 会将所有返回的发布者的输出合并到一个输出流中。我们可以通过 flatMap 操作符的 maxPublishers 参数指定返回的发布者的最大数量。
flatMap 常在错误处理中用于返回备用发布者和默认值,示例代码:
struct Model: Decodable {
    let id: Int
}

func flatMapDemo() {
        guard let data1 = #"{"id": 1}"#.data(using: .utf8),
            let data2 = #"{"i": 2}"#.data(using: .utf8),
            let data3 = #"{"id": 3}"#.data(using: .utf8)
            else { fatalError() }

        [data1, data2, data3].publisher
            .flatMap { data -> AnyPublisher<CommonOperatorsDemo.Model?, Never> in
                return Just(data)
                    .decode(type: Model?.self, decoder: JSONDecoder())
                    .catch {_ in
                        // 解析失败时,返回默认值 nil
                        return Just(nil)
                    }.eraseToAnyPublisher()
            }
            .sink(receiveValue: { value in
                print(value)
            })
            .store(in: &cancellables)
}
输出内容:
Optional(CombineDemo.CommonOperatorsDemo.Model(id: 1))
nil
Optional(CombineDemo.CommonOperatorsDemo.Model(id: 3))
错误处理在响应式编程中是一个重点内容,也是一个常见的坑!一定要小心,一定要注意!!!
如果没有 catch 操作符,上面的事件流就会因为 data2 解析失败而终止。
比如,现在将 catch 去掉:
        [data1, data2, data3].publisher
            .setFailureType(to: Error.self)
            .flatMap { data -> AnyPublisher<Model?, Error> in
                return Just(data)
                    .decode(type: Model?.self, decoder: JSONDecoder())
                    .eraseToAnyPublisher()
            }
            .sink(receiveCompletion: { completion in
                print(completion)
            }, receiveValue: { value in
                print(value)
            })
            .store(in: &cancellables)
此时,输出内容变为了:
Optional(CombineDemo.CommonOperatorsDemo.Model(id: 1))
failure(Swift.DecodingError.keyNotFound(CodingKeys(stringValue: "id", intValue: nil), Swift.DecodingError.Context(codingPath: [], debugDescription: "No value associated with key CodingKeys(stringValue: \"id\", intValue: nil) (\"id\").", underlyingError: nil)))
最终,下游订阅者因为上游发生了错误而终止了订阅,下游便无法收到 Optional(CombineDemo.CommonOperatorsDemo.Model(id: 3))。
eraseToAnyPublisher
官网文档:https://developer.apple.com/documentation/combine/anypublisher
eraseToAnyPublisher 操作符可以将一个发布者转换为一个类型擦除后的 AnyPublisher 发布者。
这样做可以避免过长的泛型类型信息,比如:Publishers.Catch<Publishers.Decode<Just<JSONDecoder.Input>, CommonOperatorsDemo.Model?, JSONDecoder>, Just<CommonOperatorsDemo.Model?>>。使用 eraseToAnyPublisher 操作符将类型擦除后,我们可以得到 AnyPublisher<Model?, Never> 类型。
除此之外,如果需要向调用方暴露内部的发布者,使用 eraseToAnyPublisher 操作符也可以对外部隐藏内部的实现细节。
示例代码请参考上文 flatMap 部分的内容。
merge
官网文档:https://developer.apple.com/documentation/combine/publishers/merge
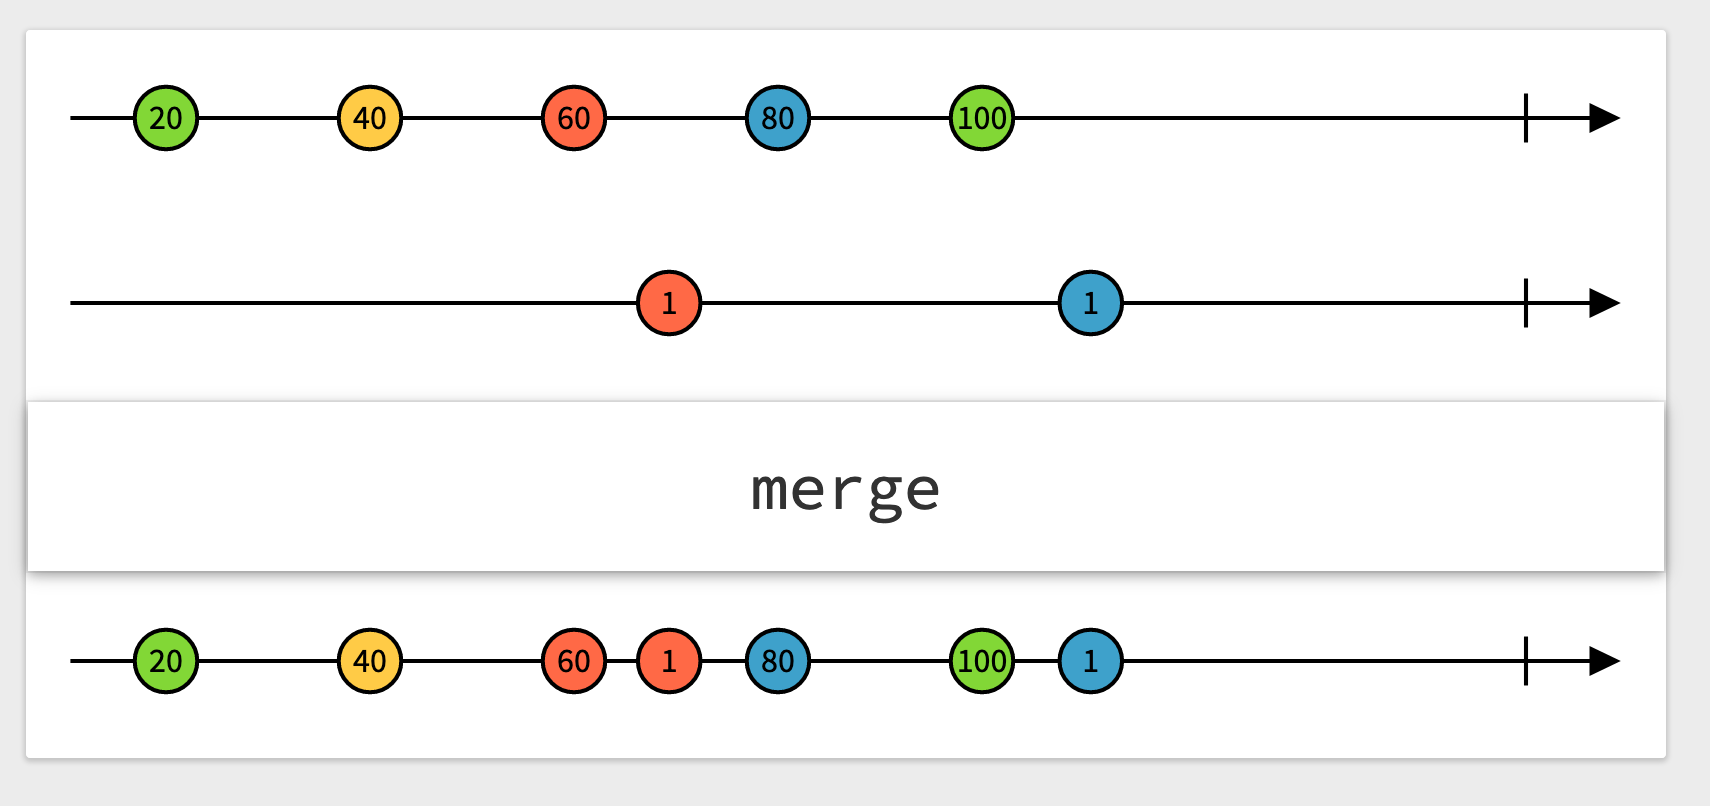
merge 操作符可以将上游发布者发送的元素合并到一个序列中。merge 操作符要求上游发布者的输出和失败类型完全相同。
merge 操作符有多个版本,分别对应上游发布者的个数:
- merge
- merge3
- merge4
- merge5
- merge6
- merge7
- merge8
示例代码:
func mergeDemo() {
        let oddPublisher = PassthroughSubject<Int, Never>()
        let evenPublisher = PassthroughSubject<Int, Never>()

        oddPublisher
            .merge(with: evenPublisher)
            .sink(receiveCompletion: { completion in
                print(completion)
            }, receiveValue: { value in
                print(value)
            })
            .store(in: &cancellables)

        oddPublisher.send(1)
        evenPublisher.send(2)
        oddPublisher.send(3)
        evenPublisher.send(4)
}
输出内容:
1
2
3
4
combineLatest
官网文档:https://developer.apple.com/documentation/combine/publishers/combinelatest
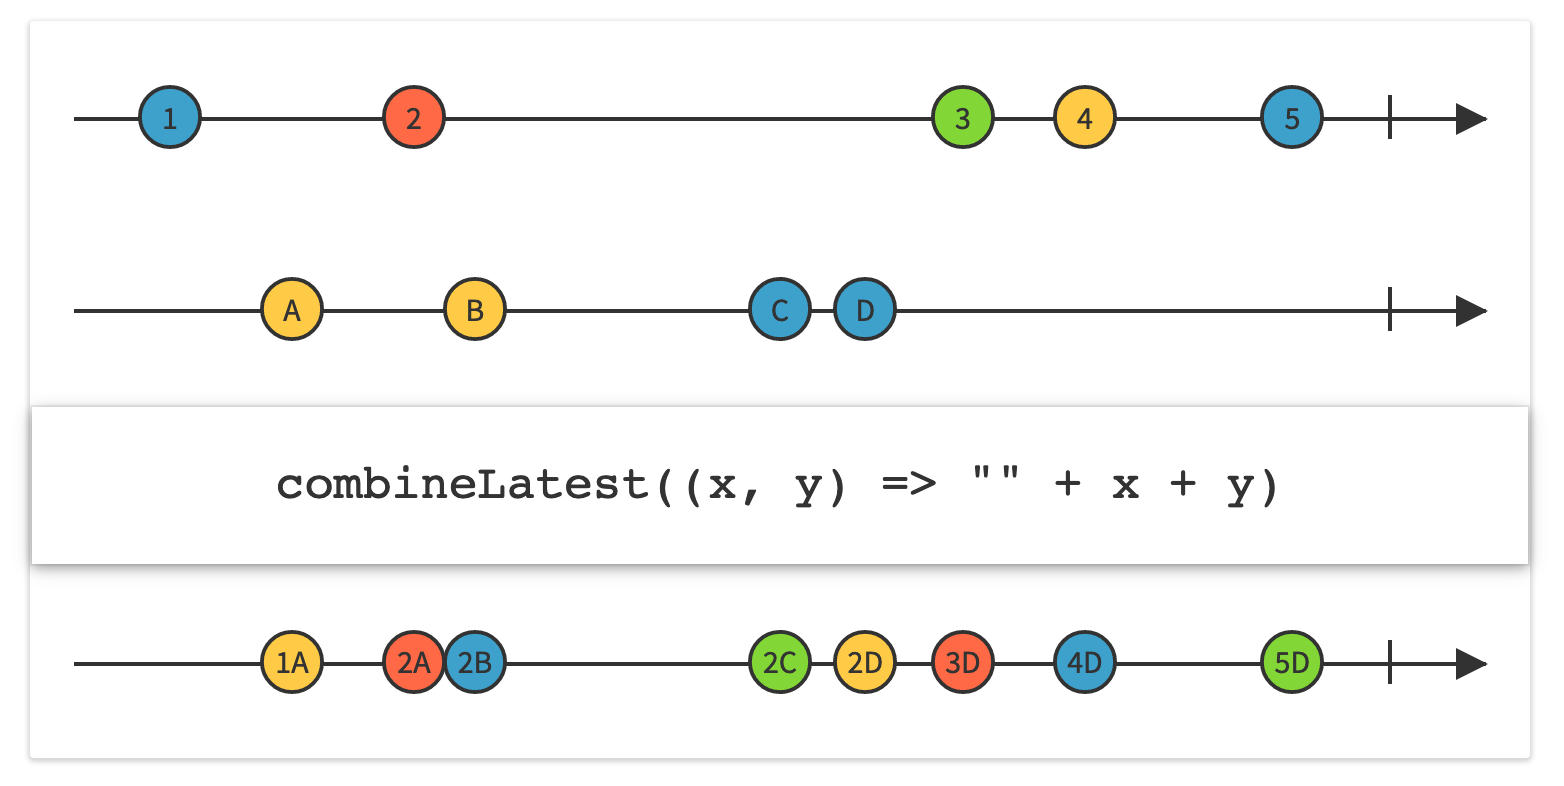
combineLatest 操作符接收来自上游发布者的最新元素,并将它们结合到一个元组后进行发送。
combineLatest 操作符要求上游发布者的失败类型完全相同,输出类型可以不同。
combineLatest 操作符有多个版本,分别对应上游发布者的个数:
- combineLatest
- combineLatest3
- combineLatest4
示例代码:
func combineLatestDemo() {
        let oddPublisher = PassthroughSubject<Int, Never>()
        let evenStringPublisher = PassthroughSubject<String, Never>()

        oddPublisher
            .combineLatest(evenStringPublisher)
            .sink(receiveCompletion: { completion in
                print(completion)
            }, receiveValue: { value in
                print(value)
            })
            .store(in: &cancellables)

        oddPublisher.send(1)
        evenStringPublisher.send("2")
        oddPublisher.send(3)
        evenStringPublisher.send("4")
}
输出内容:
(1, "2")
(3, "2")
(3, "4")
请注意,这里的第一次输出是 (1, "2"),combineLatest 操作符的下游订阅者只有在所有的上游发布者都发布了值之后才会收到结合了的值。
zip
官网文档:https://developer.apple.com/documentation/combine/publishers/zip
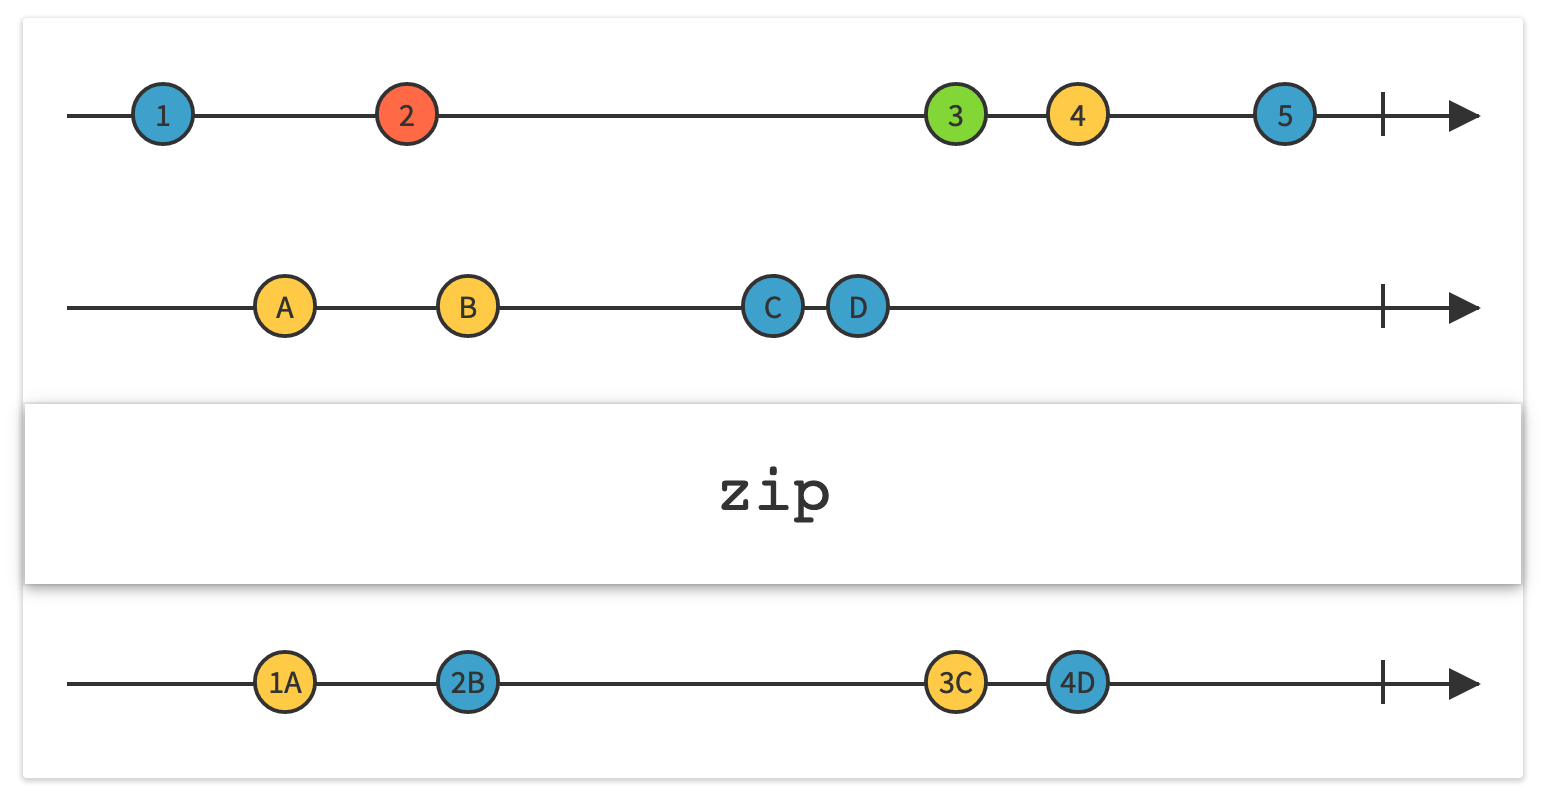
zip 操作符会将上游发布者发布的元素结合到一个流中,在每个上游发布者发送的元素配对时才向下游发送一个包含配对元素的元组。
zip 操作符要求上游发布者的失败类型完全相同,输出类型可以不同。
zip 操作符有多个版本,分别对应上游发布者的个数:
- zip
- zip3
- zip4
示例代码:
func zipDemo() {
        let oddPublisher = PassthroughSubject<Int, Never>()
        let evenStringPublisher = PassthroughSubject<String, Never>()

        oddPublisher
            .zip(evenStringPublisher)
            .sink(receiveCompletion: { completion in
                print(completion)
            }, receiveValue: { value in
                print(value)
            })
            .store(in: &cancellables)

        oddPublisher.send(1)
        evenStringPublisher.send("2")
        oddPublisher.send(3)
        evenStringPublisher.send("4")
        evenStringPublisher.send("6")
        evenStringPublisher.send("8")
}
输出内容:
(1, "2")
(3, "4")
请注意,因为 1 和 “2” 可以配对,3 和 “4” 可以配对,所以它们被输出。而 “6” 和 “8” 无法完成配对,所以没有被输出。
和 combineLatest 操作符一样,zip 操作符的下游订阅者只有在所有的上游发布者都发布了值之后才会收到结合了的值。
setFailureType
官网文档:https://developer.apple.com/documentation/combine/publishers/setfailuretype
setFailureType 操作符可以将当前序列的失败类型设置为指定的类型,主要用于适配具有不同失败类型的发布者。
示例代码:
func setFailureTypeDemo() {
        let publisher = PassthroughSubject<Int, Error>()

        Just(2)
            .setFailureType(to: Error.self)
            .merge(with: publisher)
            .sink(receiveCompletion: { completion in
                print(completion)
            }, receiveValue: { value in
                print(value)
            })
            .store(in: &cancellables)

        publisher.send(1)
}
输出内容:
2
1
如果注释 .setFailureType(to: Error.self) 这一行代码,编译器就会给出错误:Instance method 'merge(with:)' requires the types 'Never' and 'Error' be equivalent
因为,Just(2) 的失败类型是 Never,而 PassthroughSubject<Int, Error>() 的失败类型是 Error。
通过调用 setFailureType 操作符,可以将 Just(2) 的失败类型设置为 Error。
switchToLatest
官网文档:https://developer.apple.com/documentation/combine/publishers/switchtolatest
switchToLatest 操作符可以将来自多个发布者的事件流展平为单个事件流。
switchToLatest 操作符可以为下游提供一个持续的订阅流,同时内部可以切换多个发布者。比如,对 Publisher<Publisher<Data, NSError>, Never> 类型调用 switchToLatest() 操作符后,结果会变成 Publisher<Data, NSError> 类型。下游订阅者只会看到一个持续的事件流,即使这些事件可能来自于多个不同的上游发布者。
下面是一个简单的示例,可以让我们更容易理解 switchToLatest 到底做了什么。示例代码:
func switchToLatestDemo() {
        let subjects = PassthroughSubject<PassthroughSubject<String, Never>, Never>()

        subjects
            .switchToLatest()
            .sink(receiveValue: { print($0) })
            .store(in: &cancellables)

        let stringSubject1 = PassthroughSubject<String, Never>()

        subjects.send(stringSubject1)
        stringSubject1.send("A")

        let stringSubject2 = PassthroughSubject<String, Never>()

        subjects.send(stringSubject2) // 发布者切换为 stringSubject2

        stringSubject1.send("B") // 下游不会收到
        stringSubject1.send("C") // 下游不会收到

        stringSubject2.send("D")
        stringSubject2.send("E")

        stringSubject2.send(completion: .finished)
}
输出内容:
A
D
E
下面将是一个更复杂但是却更常见的用法,示例代码:
func switchToLatestDemo2() {
        let subject = PassthroughSubject<String, Error>()

        subject.map { value in
            // 在这里发起网络请求,或者其他可能失败的任务
            return Future<Int, Error> { promise in
                if let intValue = Int(value) {
                    // 根据传入的值来延迟执行
                    DispatchQueue.global().asyncAfter(deadline: .now() + .seconds(intValue)) {
                        print(#function, intValue)
                        promise(.success(intValue))
                    }
                } else {
                    // 失败就立刻完成
                    promise(.failure(Errors.notInteger))
                }
            }
            .replaceError(with: 0) // 提供默认值,防止下游的订阅因为失败而被终止
            .setFailureType(to: Error.self)
            .eraseToAnyPublisher()
        }
        .switchToLatest()
        .sink(receiveCompletion: { completion in
            print(completion)
        }, receiveValue: { value in
            print(value)
        })
        .store(in: &cancellables)

        subject.send("3") // 下游不会收到 3
        subject.send("") // 立即失败,下游会收到0,之前的 3 会被丢弃
        subject.send("1") // 延时 1 秒后,下游收到 1
}
输出内容:
0
switchToLatestDemo2() 1
1
switchToLatestDemo2() 3
请注意,在发送了 "" 之后,之前发送的 "3" 依然会触发 Future 中的操作,但是这个 Future 里的 promise(.success(intValue)) 中传入的 3,下游不会收到。
总结
Combine 中还有非常多的预置操作符,如果您感兴趣,可以去官网一探究竟:https://developer.apple.com/documentation/combine/publishers
虽然学习这些操作符的成本略高,但是当您掌握之后,开发效率必然会大幅提升。尤其是当 Combine 与 SwiftUI 以及 MVVM 结合在一起使用时,这些学习成本就会显得更加值得!因为,它们可以帮助您写出更简洁、更易读、更优雅,同时也更加容易测试的代码!
Ficow 还会继续更新 Combine 系列的文章,后续的内容会讲解如何将 Combine 与 SwiftUI 以及 MVVM 结合在一起使用。
推荐继续阅读:Combine 框架,从0到1 —— 5.Combine 中的 Scheduler
参考内容:
Using Combine
The Operators of ReactiveX
Combine — switchToLatest()
觉得不错?点个赞呗~
本文链接:Combine 框架,从0到1 —— 5.Combine 常用操作符
转载声明:本站文章如无特别说明,皆为原创。转载请注明:Ficow Shen's Blog
