Combine + MVVM 如何构建易测试的 ViewModel?
| Swift , iOS , Combine , MVVM , 架构
内容概览
- 前言
- 简单易行的静态绑定方案
- 兼容性更强的动态绑定方案
- 总结
前言
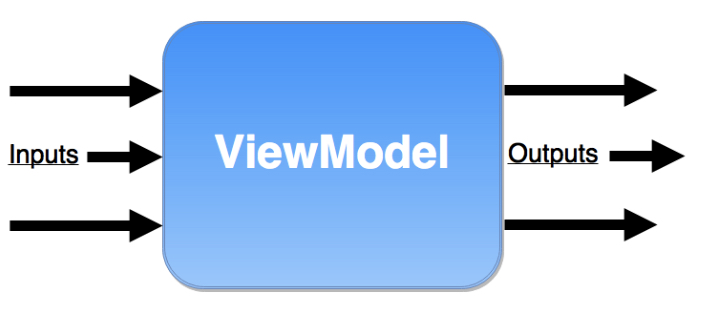
ViewModel 需要具备以下特性:
- 可插拔;
- 可测试;
- 采用绑定机制的
MVVM模式会更加强大,所以ViewModel要充分利用Combine;
把 ViewModel 当做黑箱,它可以接收输入,并产生输出,这就是定义 ViewModel 最好的原则。
本文将提供两种可行的方案,希望能够带给您一些启发~
请注意,后文中展示的示例代码用到了很多自定义的方法,这些代码存储在这个 Github 仓库。
简单易行的静态绑定方案
定义 StaticViewModel 协议
protocol StaticViewModel {
  associatedtype Input
  associatedtype Output

  func transform(input: Input) -> Output
}
这种方案简单易行,只需要 一次性提供Input 给 ViewModel,然后 ViewModel 即可给出 Output。
让我们创建示例Demo:
输入内容,然后点击Validate按钮。最后,显示校验结果。
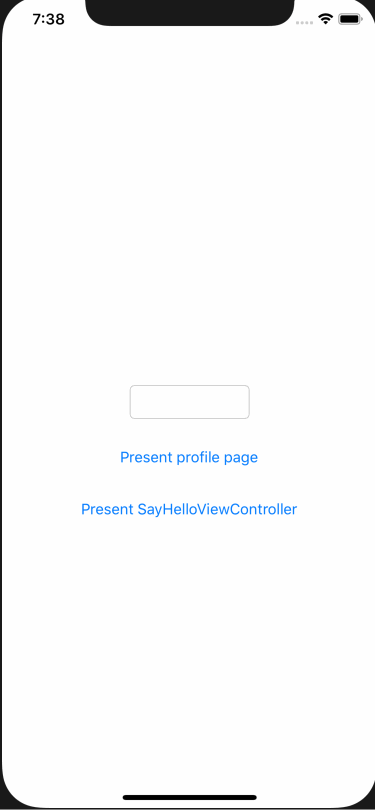
创建 StaticSayHelloViewModel,它需要知道输入的文本以及按钮点击事件,这就是Input。
然后 Output 是文本内容。
import Foundation
import Combine

final class StaticSayHelloViewModel: StaticViewModel {

  func transform(input: Input) -> Output {

    let greeting = input
        .validate
        .withLatestFrom(input.name) { (_, name) -> String in
            return name
        }
        .map { name -> String? in
            return "Hello \(name)!"
        }
        .prepend("")
        .eraseToAnyPublisher()

    return Output(greeting: greeting)
  }

}

extension StaticSayHelloViewModel {
    struct Input {
      let name: AnyPublisher<String, Never>
      let validate: AnyPublisher<Void, Never>
    }

    struct Output {
      let greeting: AnyPublisher<String?, Never>
    }
}
创建 StaticSayHelloViewController:
import UIKit
import Combine

final class StaticSayHelloViewController: UIViewController {

  @IBOutlet weak var nameTextField: UITextField!
  @IBOutlet weak var validateButton: UIButton!
  @IBOutlet weak var greetingLabel: UILabel!

  private let viewModel = StaticSayHelloViewModel()
  private var cancellables = Set<AnyCancellable>()

  override func viewDidLoad() {
    super.viewDidLoad()
    bindViewModel()
  }

  private func bindViewModel() {
    // 构建输入
    let namePublisher = nameTextField
                            .textPublisher
                            .eraseToAnyPublisher()
    let validatePublisher = validateButton
                                .publisher(for: .touchUpInside)
                                .map { _ in () }
                                .eraseToAnyPublisher()
    let inputs = StaticSayHelloViewModel.Input(name: namePublisher,
                                                                 validate: validatePublisher)
    // 根据输入构建输出
    let outputs = viewModel.transform(input: inputs)

    // 绑定输出和UI控件的属性
    outputs.greeting
        .assign(to: \.text, on: greetingLabel)
        .store(in: &cancellables)
  }
}
这个 ViewModel 是可测试且易于测试的,现在让我们来构建测试代码:
import XCTest
import Combine

@testable import CombineDemo

final class StaticSayHelloViewModelTests: XCTestCase {

    private var cancellables: Set<AnyCancellable>!

    override func setUp() {
        super.setUp()

        cancellables = Set<AnyCancellable>()
    }

    func testStaticSayHelloViewModel() throws {
        let viewModel = StaticSayHelloViewModel()

        // 构建用于测试的输入
        let namePublisher = PassthroughSubject<String, Never>()
        let validatePublisher = PassthroughSubject<Void, Never>()
        let input = StaticSayHelloViewModel.Input(name: namePublisher.eraseToAnyPublisher(), validate: validatePublisher.eraseToAnyPublisher())

        // 使用 expectation 来等待测试结果
        let expect = expectation(description: #function)
        var times = 0

        let output = viewModel.transform(input: input)

        output.greeting
            .sink { value in
                if times == 0 { // 因为使用了 prepend 操作符,所以第一次会发送空字符串
                    XCTAssertEqual(value, "")
                } else { // 第二次会发送拼接好的字符串
                    XCTAssertEqual(value, "Hello Ficow Shen!")
                    expect.fulfill()
                }
                times += 1
            }
            .store(in: &cancellables)

        namePublisher.send("Ficow Shen")
        validatePublisher.send(())

        wait(for: [expect], timeout: 3)
    }
}
ViewModel 包含了该页面最核心的业务逻辑,只要我们编写的测试能够覆盖 ViewModel 中的关键代码,该页面的业务逻辑就有了最基本的质量保障!
除此之外,ViewModel 应该是可插拔的,那么我们可以把之前定义的 ViewModel 用于 其他 View 吗?
现在,如果我们尝试将之前的 ViewModel 用于带有 TableView 的 View,会发生什么事情?
import UIKit
import Combine

final class TextFieldCell: UITableViewCell {
  @IBOutlet weak var nameTextField: UITextField!
}

final class ButtonCell: UITableViewCell {
  @IBOutlet weak var validateButton: UIButton!
}

final class GreetingCell: UITableViewCell {
  @IBOutlet weak var greetingLabel: UILabel!
}


final class DynamicSayHelloViewController: UIViewController, UITableViewDataSource {
    static let cellIdentifiers = [
        "TextFieldCell",
        "ButtonCell",
        "GreetingCell"
    ]

    func tableView(_ tableView: UITableView, numberOfRowsInSection section: Int) -> Int {
      return Self.cellIdentifiers.count
    }

    func tableView(_ tableView: UITableView, cellForRowAt indexPath: IndexPath) -> UITableViewCell {
      // 常见的 cell 复用逻辑
    }

    private let viewModel = StaticSayHelloViewModel()
    private var cancellables = Set<AnyCancellable>()

    override func viewDidLoad() {
      super.viewDidLoad()
      bindViewModel()
    }

    private func bindViewModel() {
      // 如何定义输入???
      let inputs = StaticSayHelloViewModel.Input(name: 😱😱, validate: 😱😱)
    }
}
然而,我们甚至无法为 ViewModel 提供 Input。
因为我们不能在创建 ViewModel 时就获取到 UITableView 的内容。
所以,使用这种方案有一个前提条件:在创建 ViewModel 的 Input 时,可以获得全部所需的资源。
这时,你就需要采用第二种方案了!
兼容性更强的动态绑定方案
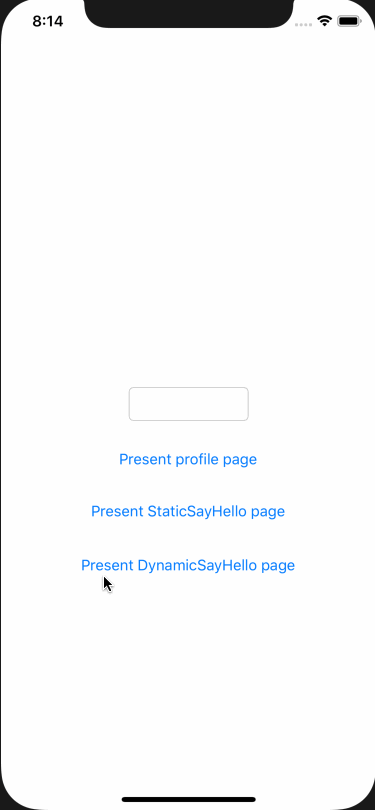
让我们创建另一个示例Demo:
输入内容,然后点击Validate按钮。最后,显示校验结果。
定义 DynamicViewModel 协议:
protocol DynamicViewModel {
    associatedtype Input
    associatedtype Output

    var input: Input { get }
    var output: Output { get }
}
这样,我们就可以完全自由地选择何时提供输入、何时订阅输出了。
Subject可以同时充当Publisher和Subscriber,把命令式的编程变为 Combine 的函数响应式编程。
定义采用 Subject 的 DynamicSayHelloViewModel:
import Foundation
import Combine

final class DynamicSayHelloViewModel: DynamicViewModel {
    let input: Input
    let output: Output

    private let nameSubject = CurrentValueSubject<String, Never>("")
    private let validateSubject = PassthroughSubject<Void, Never>()

    init() {
        let greeting = validateSubject
            .withLatestFrom(nameSubject) { (_, name) in
                return name
            }
            .map { name -> String? in
                return "Hello \(name)!"
            }
            .prepend("")
            .eraseToAnyPublisher()

        self.output = Output(greeting: greeting)

        // asAnySubscriber() 是自定义的方法,用于将 Subject 封装在一个 AnySubscriber 中
        self.input = Input(name: nameSubject.asAnySubscriber(),
                           validate: validateSubject.asAnySubscriber())
    }
}

extension DynamicSayHelloViewModel {
    struct Input {
        // AnySubscriber 可以帮助隐藏内部的实现细节
        let name: AnySubscriber<String, Never>
        let validate: AnySubscriber<Void, Never>
    }

    struct Output {
        // AnyPublisher 可以帮助隐藏内部的实现细节
        let greeting: AnyPublisher<String?, Never>
    }
}
这里有几点值得注意的内容:
ViewModel的任务还是输入Input产出Output;Subjects是private的,所以你只能通过 input 和 output 属性与ViewModel交互;- 兼具
可插拔、可测试的特性,并且充分利用了Combine 的绑定机制;
View部分的实现:
import UIKit
import Combine

/// 每个和 DynamicSayHelloViewModel 进行交互的 View 都需要遵循这个协议
protocol DynamicSayHelloViewModelBindable {
    var cancellable: Cancellable? { get }
    func bind(to viewModel: DynamicSayHelloViewModel)
}

final class TextFieldCell: UITableViewCell, DynamicSayHelloViewModelBindable {

    @IBOutlet weak var nameTextField: UITextField!
    var cancellable: Cancellable?

    override func prepareForReuse() {
        super.prepareForReuse()

        // 释放订阅
        cancellable = nil
    }

    func bind(to viewModel: DynamicSayHelloViewModel) {
        // 更新绑定时,需要将旧的绑定废弃。旧的 cancellable 引用计数为 0 时,旧的订阅即可被释放
        cancellable = nameTextField
            .textPublisher
            .bind(to: viewModel.input.name) // 动态地将输入框的内容绑定到 viewModel 的输入上
    }
}

final class ButtonCell: UITableViewCell, DynamicSayHelloViewModelBindable {

    @IBOutlet weak var validateButton: UIButton!
    var cancellable: Cancellable?

    override func prepareForReuse() {
        super.prepareForReuse()

        cancellable = nil
    }

    func bind(to viewModel: DynamicSayHelloViewModel) {
        cancellable = validateButton.publisher(for: .touchUpInside)
            .mapToVoid()
            .bind(to: viewModel.input.validate)
    }
}

final class GreetingCell: UITableViewCell, DynamicSayHelloViewModelBindable {

    @IBOutlet weak var greetingLabel: UILabel!
    var cancellable: Cancellable?

    override func prepareForReuse() {
        super.prepareForReuse()

        cancellable = nil
    }

    func bind(to viewModel: DynamicSayHelloViewModel) {
        cancellable = viewModel.output
            .greeting
            .assign(to: \.text, on: greetingLabel)
    }
}


final class DynamicSayHelloViewController: UIViewController, UITableViewDataSource, UITableViewDelegate {

    static let cellIdentifiers = [
        "TextFieldCell",
        "ButtonCell",
        "GreetingCell"
    ]

    @IBOutlet weak var tableView: UITableView! {
        didSet {
            tableView.dataSource = self
            tableView.delegate = self
            tableView.tableFooterView = UIView() // 移除空白行
        }
    }

    private let viewModel = DynamicSayHelloViewModel()

    func tableView(_ tableView: UITableView, numberOfRowsInSection section: Int) -> Int {
        return Self.cellIdentifiers.count
    }

    func tableView(_ tableView: UITableView, cellForRowAt indexPath: IndexPath) -> UITableViewCell {
        let cell = tableView.dequeueReusableCell(withIdentifier: Self.cellIdentifiers[indexPath.row], for: indexPath)
        (cell as? DynamicSayHelloViewModelBindable)?.bind(to: viewModel)
        return cell
    }

    func tableView(_ tableView: UITableView, heightForRowAt indexPath: IndexPath) -> CGFloat {
        return 50
    }
}
接下来,让我们为 DynamicSayHelloViewModel 构建测试:
import XCTest
import Combine

@testable import CombineDemo

final class DynamicSayHelloViewModelTests: XCTestCase {

    private var cancellables: Set<AnyCancellable>!

    override func setUp() {
        super.setUp()

        cancellables = Set<AnyCancellable>()
    }

    func testDynamicSayHelloViewModel() throws {
        let viewModel = DynamicSayHelloViewModel()

        // 使用 expectation 来等待测试结果
        let expect = expectation(description: #function)
        var times = 0

        viewModel.output
            .greeting
            .sink { value in
                if times == 0 { // 因为使用了 prepend 操作符,所以第一次会发送空字符串
                    XCTAssertEqual(value, "")
                } else { // 第二次会发送拼接好的字符串
                    XCTAssertEqual(value, "Hello Ficow Shen!")
                    expect.fulfill()
                }
                times += 1
            }
            .store(in: &cancellables)

        // 用于测试的输入
        _ = viewModel.input.name.receive("Ficow Shen")
        _ = viewModel.input.validate.receive(())

        wait(for: [expect], timeout: 3)
    }
}
从最后的实现来看,方案二确实比方案一的实现更繁琐一些。但是,相比于方案一,方案二给输入提供了足够的灵活性。换一句我们常说的话就是:方案一把输入给写死了~
总结
建议您根据实际的需要来决定采用哪一种方案。
第一种方案 简单易行,但是有一定的 局限性,因为输入被写死了。
第二种方案 兼容性强,但是定义及使用都略显 繁琐。
参考内容:
RxSwift + MVVM 如何构建 ViewModel ?
RxSwift + MVVM: how to feed ViewModels
示例代码所在的 Github 仓库
觉得不错?点个赞呗~
本文链接:Combine + MVVM 如何构建易测试的 ViewModel?
转载声明:本站文章如无特别说明,皆为原创。转载请注明:Ficow Shen's Blog
