iOS Dynamic Type 实战总结
| Swift , iOS , Accessibility
内容概览
- 前言
- 设计规范
- 实现 Dynamic Type
- 使用系统默认的字体
- 使用自定义的字体
- 限制动态缩放字体的字号
- 更新字体的大小
- 观察字体大小的变化
- 调整字体大小
- 使用模拟器调试 Dynamic Type
- 使用 Accessibility Inspector
- 使用 Environment Overrides
- 使用真机调试 Dynamic Type
- 为 Dynamic Type 添加单元测试
- 总结
前言
社会的老龄化程度日益加剧,政府也开始出台一些针对年长人群的政策,各种 iOS App 也开始积极响应,发布了诸如【长辈模式】、【大字模式】等新功能。
对于美国用户,美国政府也有类似的法律,如:ADA 法案。即使是视弱人士,也应该有权享有较好的应用体验。
庆幸的是,高瞻远瞩的苹果公司早就在 iOS 中内置了强大且友好的 Accessibility 功能,这让我们 iOS 开发者受益匪浅。
Ficow 根据自己的实战经验,总结了一些开发 Dynamic Type 功能需要掌握的相关内容,希望对您有所帮助。如有错误,欢迎斧正~
设计规范
如果UI元素可以放大、缩小,那么原有的元素布局就有可能因为界面元素大小的变化而变得凌乱不堪。
想要实现更好的 Dynamic Type 效果,我们需要 UI 设计师来定义怎样的 Dynamic Type 效果对用户更友好。
在此,Ficow 建议实操的流程如下:
- 工程师将页面的元素全部改为可调节的状态,然后为设计师提供一个测试安装包;
- 设计师反复把玩测试安装包,然后定义界面元素的 Dynamic Type 的效果;
- 如果有必要的话,可以考虑限制某些元素(字体、图标)的最大放大/缩小比例;
另外,设计师还需要熟知 Typography - Human Interface Guidelines 中 Dynamic Type Sizes 和 Larger Accessibility Type Sizes 部分提供的参数,并根据这些参数来为 App 中的 Dynamic Type 设置最后的验收标准。
相关的参数如下图所示:
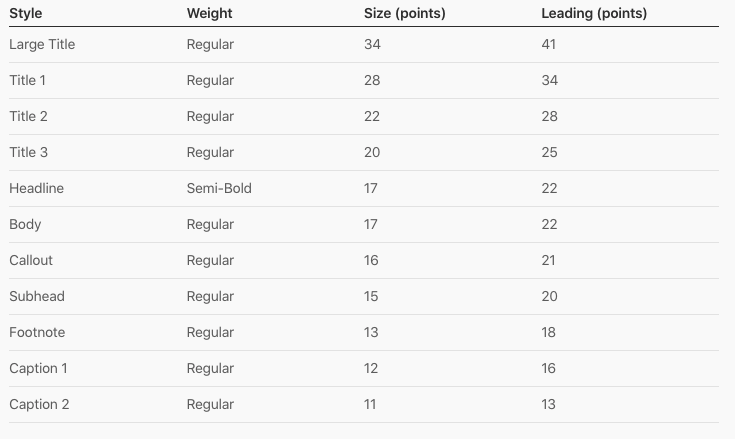
通过这样一份参数表,设计师可以很便捷地了解各种 UIContentSizeCategory 或 DynamicTypeSize 中不同 Text Style 的信息。
实现 Dynamic Type
根据官方文档,要从开发层面支持 Dynamic Type 其实很简单,主要有两种方式:
使用系统默认的字体
label.font = UIFont.preferredFont(forTextStyle: .body)
label.adjustsFontForContentSizeCategory = true
将 label 的 adjustsFontForContentSizeCategory 属性设置为 true 之后,当用户在调整设备的文本大小时,该 label 的文本就会自动调整文本的大小。
如果 adjustsFontForContentSizeCategory 为 false,您就需要手动观察设备文本大小的变化,手动处理的方式请参考后续内容。
使用自定义的字体
guard let customFont = UIFont(name: "CustomFont-Light", size: UIFont.labelFontSize) else {
    fatalError("""
        Failed to load the "CustomFont-Light" font.
        Make sure the font file is included in the project and the font name is spelled correctly.
        """
    )
}
label.font = UIFontMetrics(forTextStyle: .headline).scaledFont(for: customFont)
label.adjustsFontForContentSizeCategory = true
首先,根据自定义字体的名字创建相应字号的 UIFont 对象。
然后,根据 TextStyle 创建相应的 UIFontMetrics,再基于这个 TextStyle 生成自定义字体对象的可缩放字体对象。
最后,将 label 的 adjustsFontForContentSizeCategory 属性设置为 true。
限制动态缩放字体的字号
不过,如果您想要限制动态缩放字体的最大、最小字号,上面的方案是做不到的。因为,上面的方案会让系统完全根据设备的字体大小设置来调整文字的字号。Ficow 在这里提供一种比较粗暴的实现方式供您参考。
首先,通过以下示例代码来获取设备中的 ContentSizeCategory 设置值:
UIApplication.shared.preferredContentSizeCategory
然后,检查该 ContentSizeCategory 值是否符合缩放范围。如果其不在缩放范围内, 则直接使用对应的 ContentSizeCategory 边界值(最大或者最小)。您可以直接比较 ContentSizeCategory 的值,示例代码如下:
let isSizeSmallerThanDefaultLarge = preferredContentSizeCategory < .large
如果其在缩放范围内,则需要结合字体的 TextStyle 和该 ContentSizeCategory 创建对应的可缩放字体:
let scalableFont = UIFont.preferredFont(forTextStyle: textStyle, compatibleWith: UITraitCollection(preferredContentSizeCategory: currentContentSizeCategory))
由于该字体会自动放大缩小,所以我们不能直接使用它。我们需要根据该字体的字号来生成对应的不可缩放版本的字体:
let fontSize = scalableFont.pointSize
可能您会问,这里该如何获取原始字体的 textStyle 呢?
您可以通过 CoreText 来创建自己的字体对象:
let newFont = CTFontCreateWithFontDescriptor(descriptor, size, nil) as UIFont
这样做,即使 descriptor 和 size 是一样的,最后的字体对象也不同。但是,如果使用 UIFont 的初始化方法,您总会得到同一个字体对象(UIKit做了特殊处理):
let descriptor = let descriptor = UIFontDescriptor(fontAttributes: [UIFontDescriptor.AttributeName.name: "YourCustomFont"])
let size: CGFloat = 18
let uiFont1 = UIFont(descriptor: descriptor, size: size)
let uiFont2 = UIFont(descriptor: descriptor, size: size)
print(uiFont1 === uiFont2) // true
此时,如果您用这种方式生成了一个字体对象 title1:
let title1 = CTFontCreateWithFontDescriptor(descriptor, size, nil) as UIFont
您就可以在之前需要获取 textStyle 的地方通过比较该字体对象和 title1 对象来确定此时是否应该使用 title1 级别的 TextStyle。
如下图所示,这是 UIFont.TextStyle 所有的枚举值:
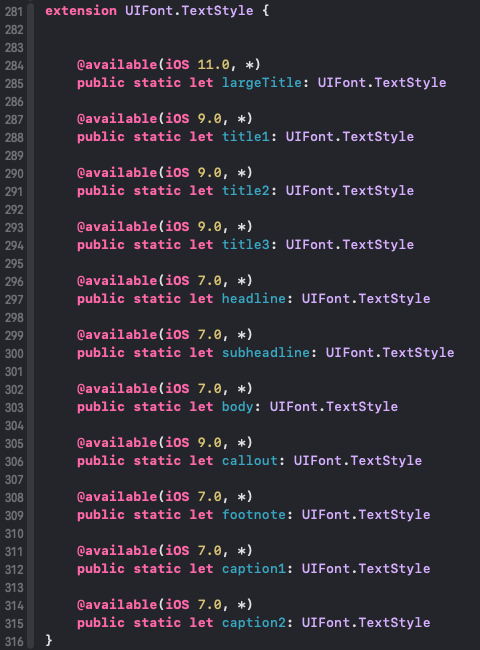
所以,您需要为每一种 text style 生成一个与之对应的字体对象。
在获得正确的字体字号之后,您只需要根据该字号生成新的字体对象即可。此时,您需要用到 UIFont 中的方法:
func withSize(_ fontSize: CGFloat) -> UIFont
最后,将该字体赋值给 UI 控件的 font 属性即可。
如果您还有更好的解决方案,欢迎您留言与 Ficow 分享,谢谢~
更新字体的大小
如果 UI 控件已经监听了字体大小改变的通知,在您改变字体大小后,UI 控件会自动进行缩放。比如,UITableView会在字体大小发生变化后自动刷新列表中的内容,如果列表中的 UILabel 已经配置了动态字体而且将 adjustsFontForContentSizeCategory 属性设置为了 true,您将看到该 label 的字体大小发生变化。
如果 UI 控件不能及时更新字体的大小,有可能是因为该控件未自动监听字体大小改变的通知,也有可能是您并没有按照 Apple 的指引来实现 Dynamic Type。
这时候,您就需要参照以下内容来更新字体的大小。
观察字体大小的变化
- 用通知中心观察名为
UIContentSizeCategory.didChangeNotification的通知; - 重写
view/view controller的func traitCollectionDidChange(_ previousTraitCollection: UITraitCollection?)方法;
调整字体大小
在检测到字体大小发生变化后,您可以通过以下方式来决定是否进行字体缩放:
- 如果监听了字体大小改变的通知(UIContentSizeCategory.didChangeNotification),您可以检查
UIApplication.shared.preferredContentSizeCategory或UITraitCollection.current.preferredContentSizeCategory等属性; - 如果需要改写某些 view controller 整个页面的字体大小,可以修改其
UITraitCollection,您可以传入您想要的ContentSizeCategory:let traitCollection = UITraitCollection(preferredContentSizeCategory: contentSizeCategory) setOverrideTraitCollection(traitCollection, forChild: childVC) - 如果重写了
func traitCollectionDidChange(_ previousTraitCollection: UITraitCollection?)方法,您可以检查当前view/view controller的traitCollection属性中的preferredContentSizeCategory属性;
使用模拟器调试 Dynamic Type
使用 Accessibility Inspector
首先,在 Xcode 的菜单中启动 Accessibility Inspector:
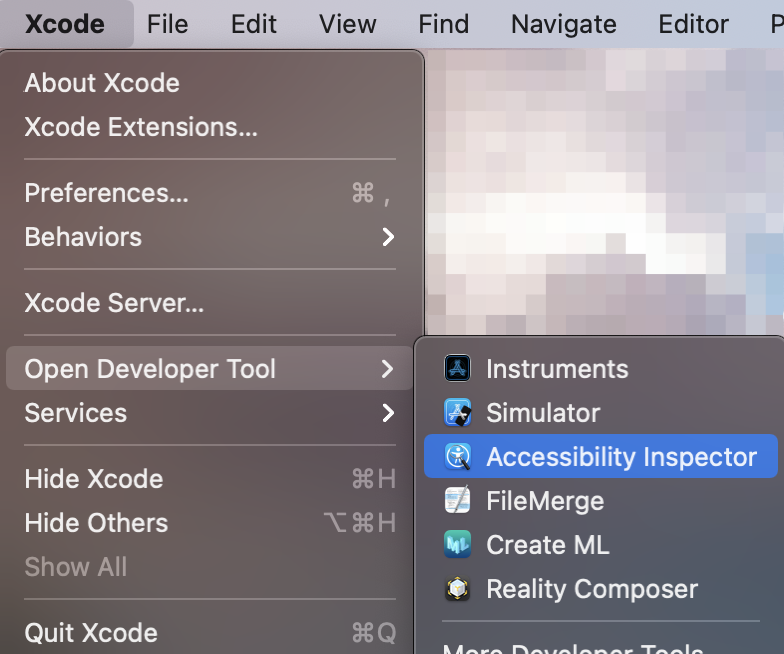
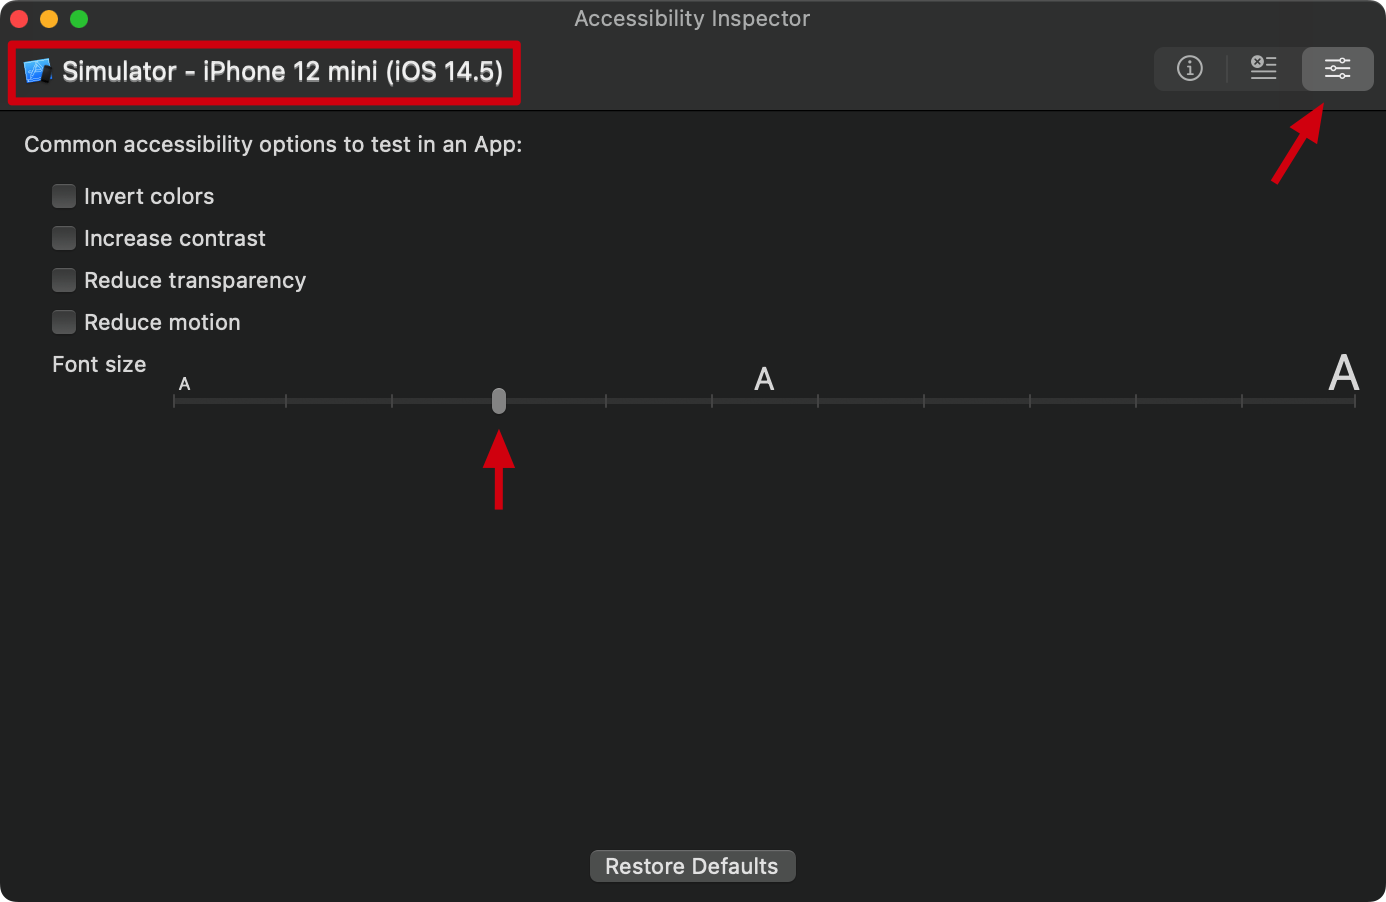
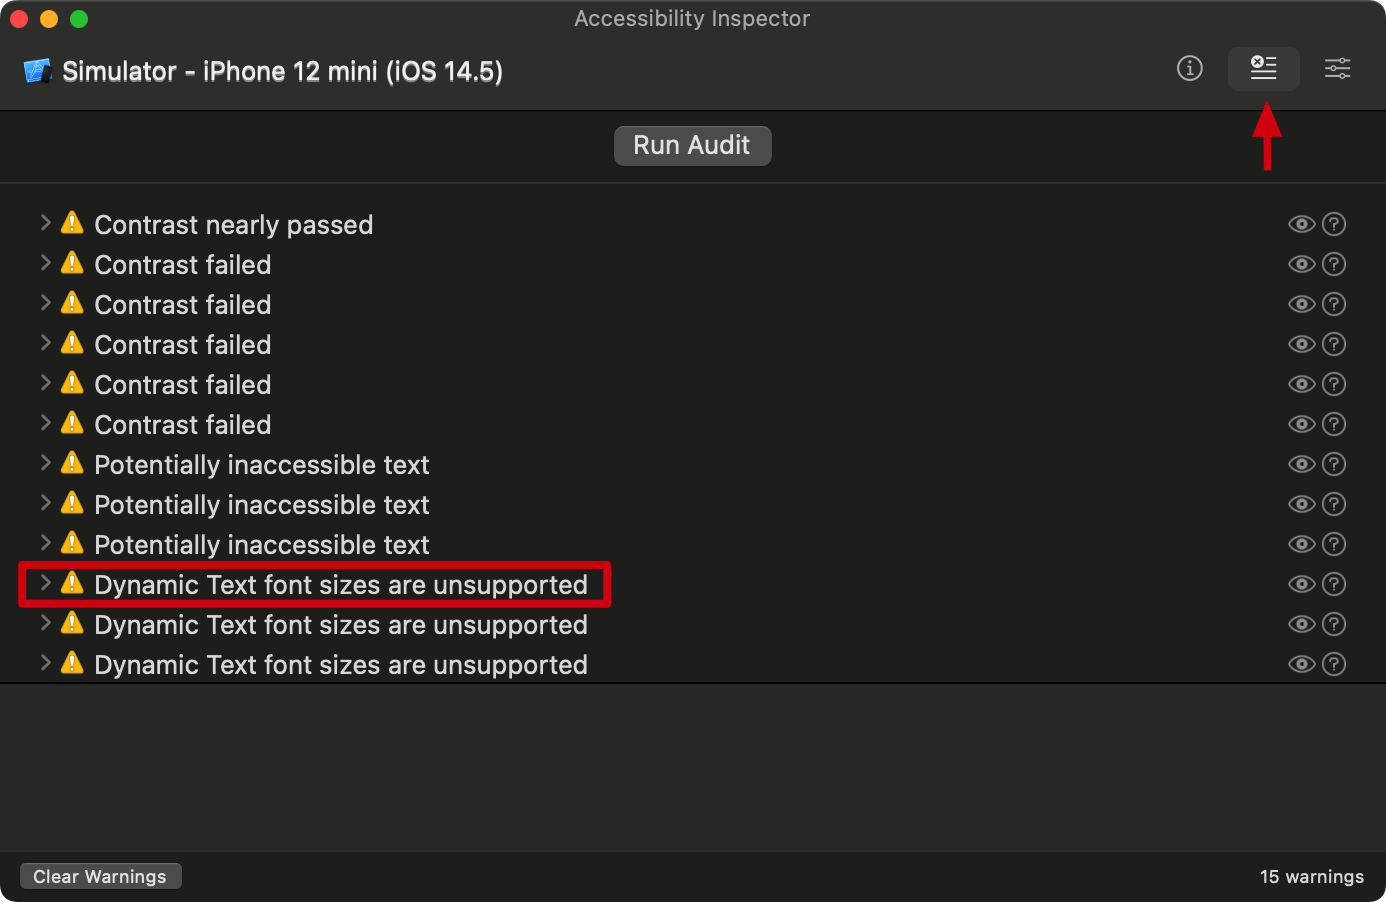
您可以在左上角选择要操作的设备,比如 Ficow 选择了模拟器。然后,再选择 inspection, audit, settings 中最右边的那个面板。
此时,您会看到 font size 部分默认选中了 UIContentSizeCategory.large 级别。您可以通过拖动滑动条来调节当前设备的字体大小。
如果您采用了 Apple 官方推荐的方式来实现 Dynamic Type,那么您可以用 audit 面板来检查页面的动态字体支持情况:
使用 Environment Overrides
在模拟器中启动要调试的 App,然后您可以在调试区域找到该菜单:
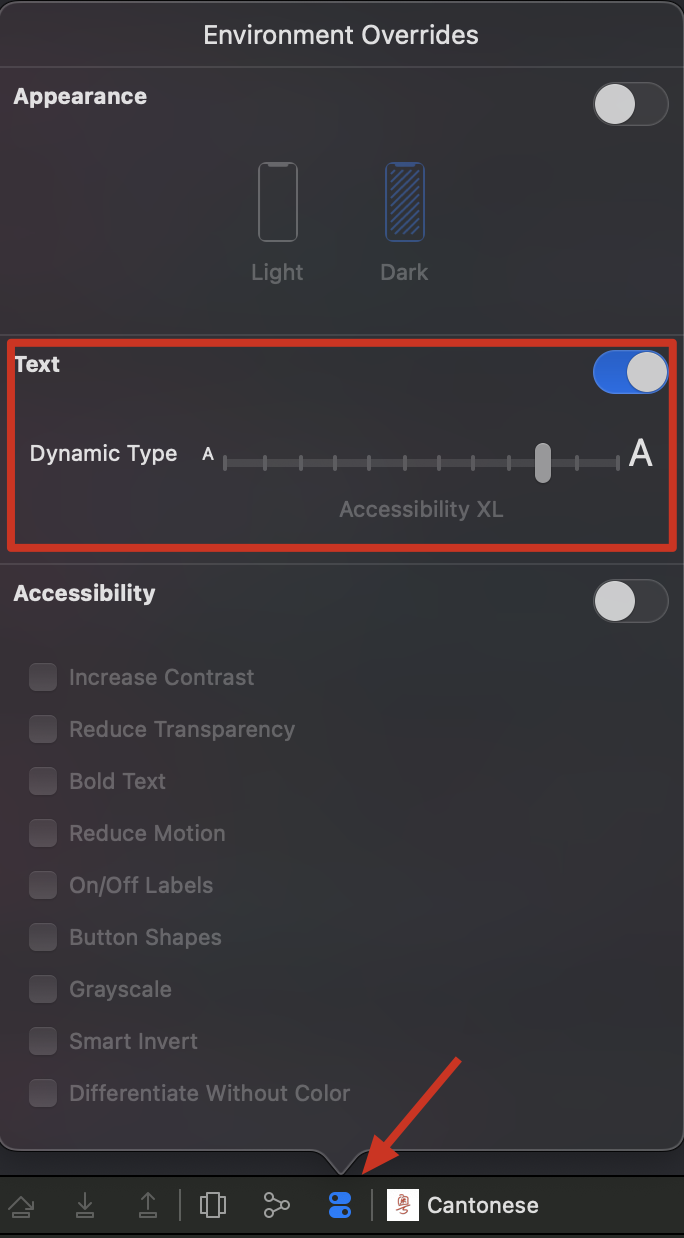
开启 Text 旁边的开关,然后滑动 Dynamic Type 滑动条,您可以看到模拟器中的字体进行实时的更新。
Ficow 个人认为,Environment Overrides 比 Accessibility Inspector 更易用。我们不用启动另一个应用,而且也不会因为 Accessibility Inspector 导致快捷键冲突(亲身经历过)。
使用真机调试 Dynamic Type
除了用模拟器,您也可以用真机来检验 Dynamic Type 的效果。
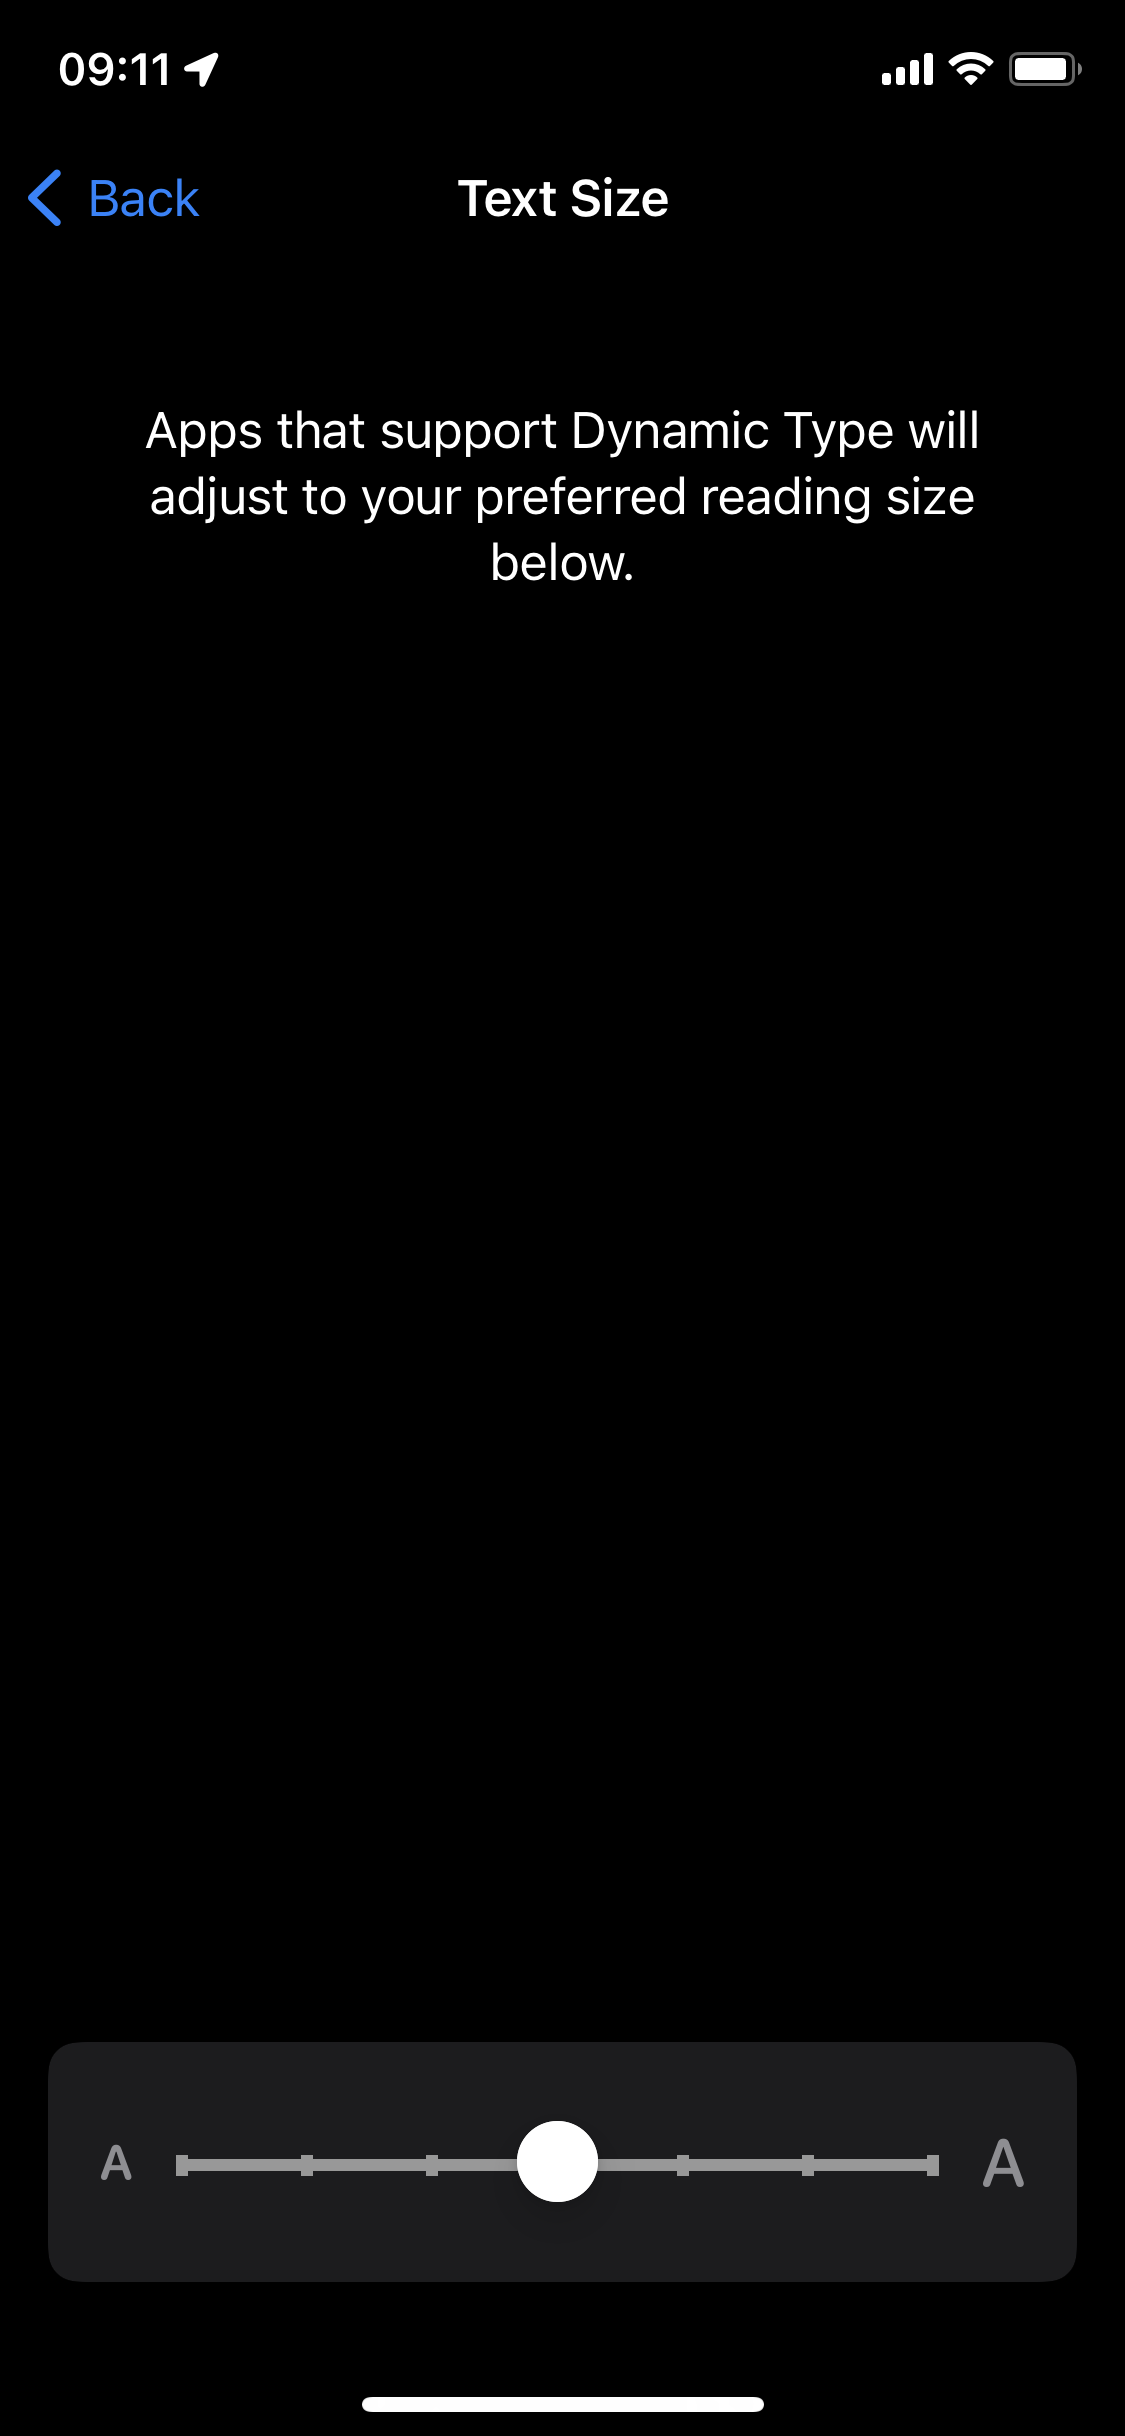
打开系统设置,然后选择 Display & Brightness → Text Size,您将看到 7 级调节菜单,这不包括 accessibility 级别的缩放大小。
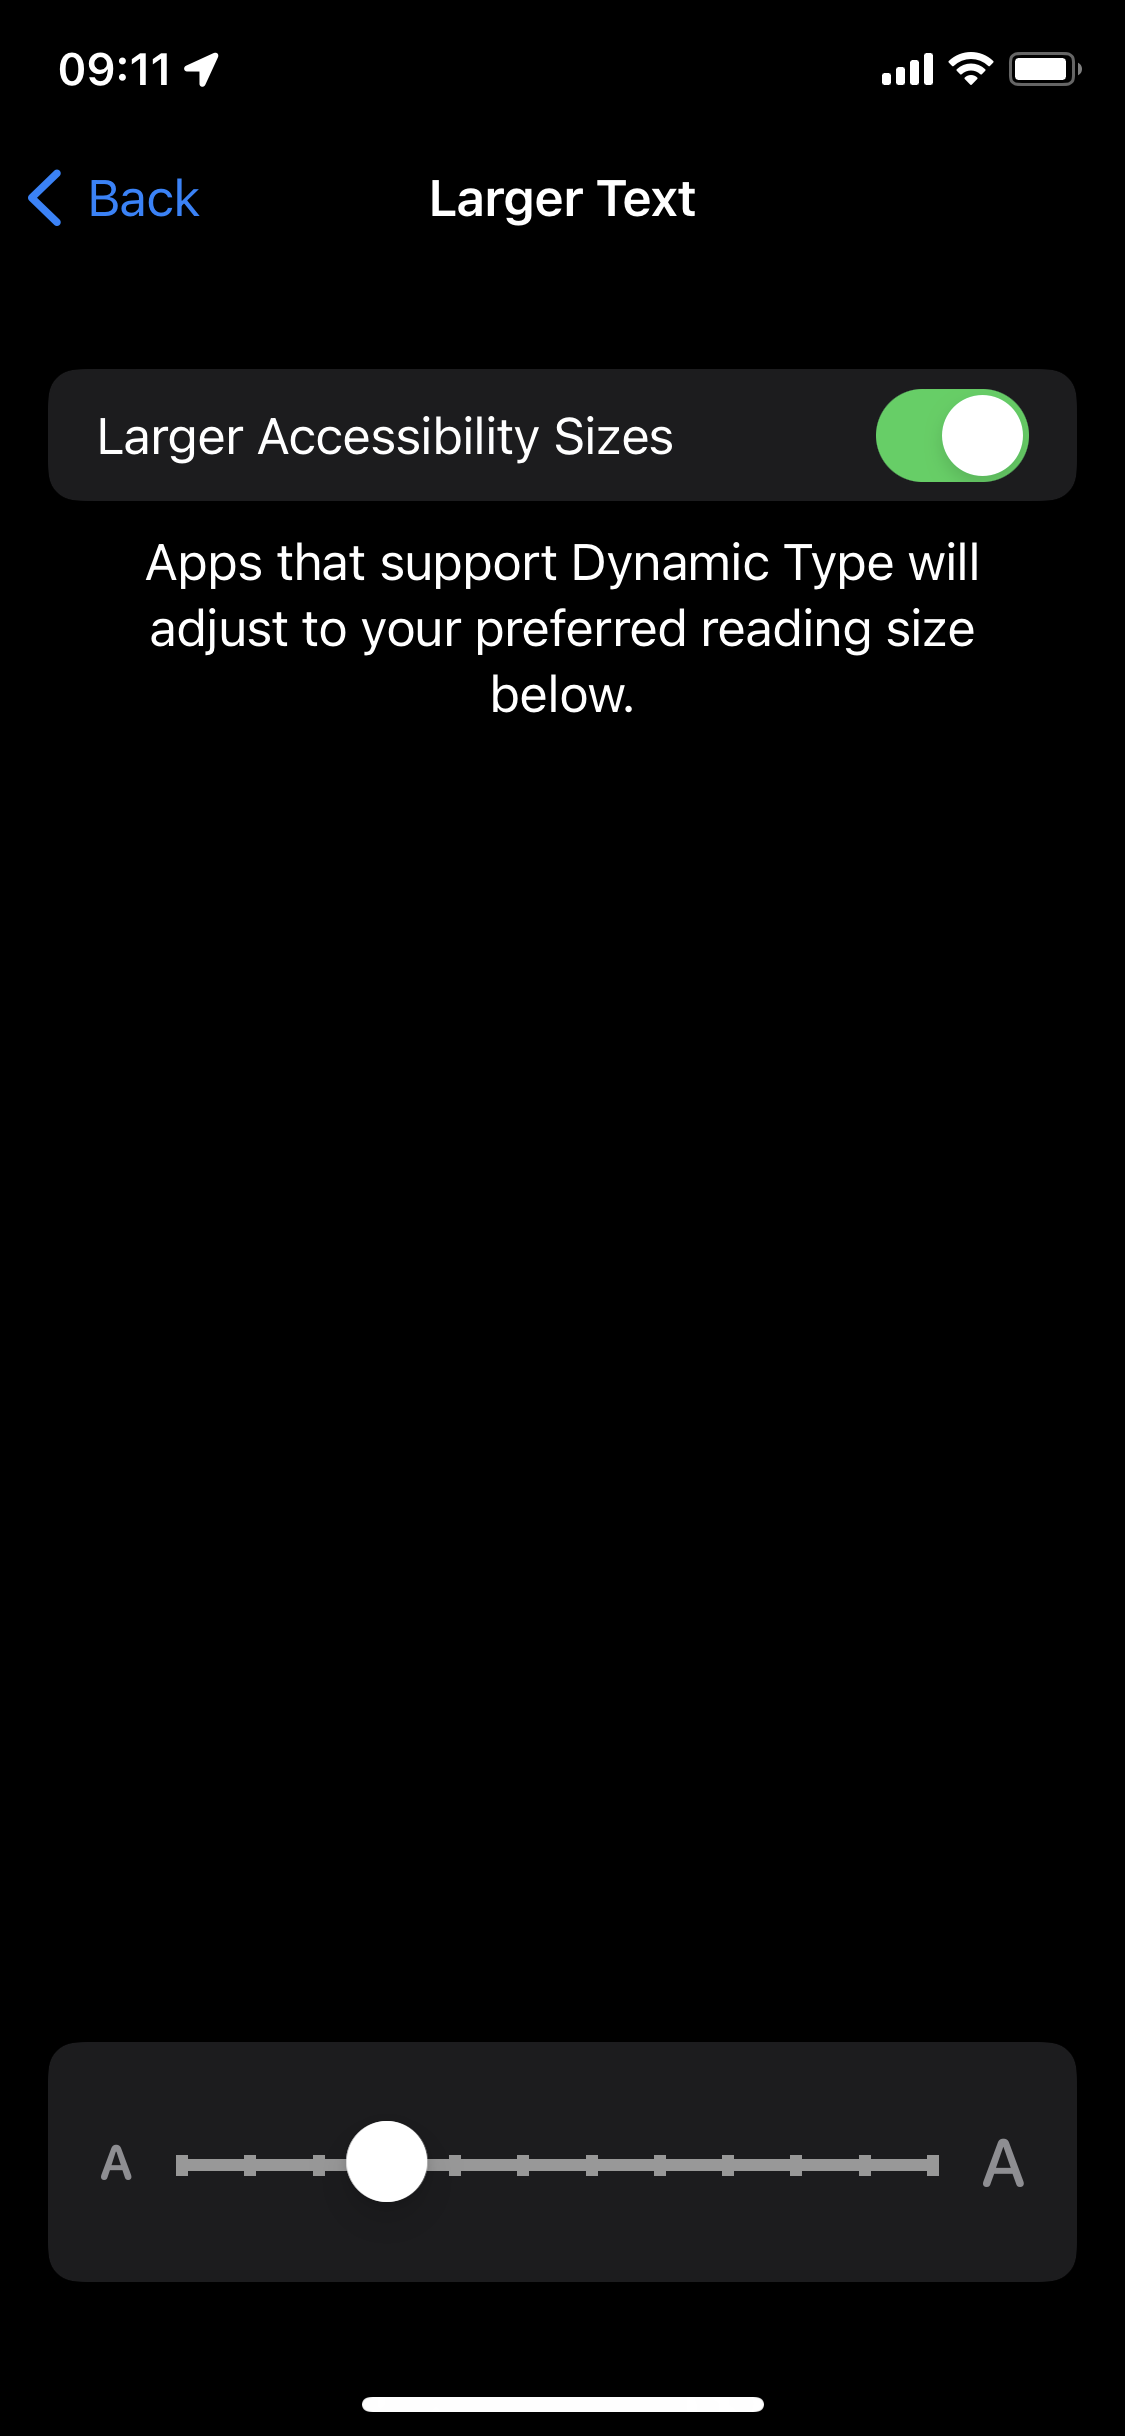
如果需要检查所有的动态缩放级别(12 级),您需要选择这个路径: Accessibility → Display & Text Size → Larger Text。
| Display & Brightness → Text Size | Accessibility → Display & Text Size → Larger Text |
|---|---|
 |
 |
UIContentSizeCategory 各个缩放级别的定义如下所示:
    @available(iOS 7.0, *)
    public static let extraSmall: UIContentSizeCategory

    @available(iOS 7.0, *)
    public static let small: UIContentSizeCategory

    @available(iOS 7.0, *)
    public static let medium: UIContentSizeCategory

    @available(iOS 7.0, *)
    public static let large: UIContentSizeCategory

    @available(iOS 7.0, *)
    public static let extraLarge: UIContentSizeCategory

    @available(iOS 7.0, *)
    public static let extraExtraLarge: UIContentSizeCategory

    @available(iOS 7.0, *)
    public static let extraExtraExtraLarge: UIContentSizeCategory


    // Accessibility sizes
    @available(iOS 7.0, *)
    public static let accessibilityMedium: UIContentSizeCategory

    @available(iOS 7.0, *)
    public static let accessibilityLarge: UIContentSizeCategory

    @available(iOS 7.0, *)
    public static let accessibilityExtraLarge: UIContentSizeCategory

    @available(iOS 7.0, *)
    public static let accessibilityExtraExtraLarge: UIContentSizeCategory

    @available(iOS 7.0, *)
    public static let accessibilityExtraExtraExtraLarge: UIContentSizeCategory
为 Dynamic Type 添加单元测试
Dynamic Type 最终只影响到界面元素,所以为了确保 UI 在开启 Dynamic Type 的情况下依然正确显示,我们有必要为其添加单元测试。
长话短说,Ficow 建议您采用 iOSSnapshotTestCase 来为支持动态缩放的 UI 控件或页面添加单元测试。
示例代码
这是一个官方仓库中的 测试用例 demo:
import FBSnapshotTestCase

class FBSnapshotTestCaseSwiftTest: FBSnapshotTestCase {
  override func setUp() {
    super.setUp()
    recordMode = false
  }

  func testExample() {
    let view = UIView(frame: CGRect(x: 0, y: 0, width: 64, height: 64))
    view.backgroundColor = UIColor.blue
    FBSnapshotVerifyView(view)
    FBSnapshotVerifyLayer(view.layer)
  }
}
工作原理
其实,它的工作原理非常简单:
首先,在 setUp() 方法中将 recordMode 属性设置为 true,然后运行测试用例,该框架会运行 FBSnapshotTestCase 子类中带有 test 前缀名的方法,并基于 FBSnapshotVerifyView 和 FBSnapshotVerifyLayer 等方法中传入的参数生成图片。如果需要修改之前生成的图片,您只需要重复这个过程即可,旧的图片会被新生成的图片自动覆盖。
之后,在 setUp() 方法中将 recordMode 属性设置为 false,然后运行测试用例,该框架会运行 FBSnapshotTestCase 子类中带有 test 前缀名的方法,并比对已生成的图片和现在新生成的图片。如果图片相同,则测试成功,否则测试失败。
自定义验证参数

identifier:指定生成的图片文件的名称,如果要为多个 UIContentSizeCategory 生成图片,建议这个参数设置为 UIContentSizeCategory 的枚举值的名称;perPixelTolerance:设置每个像素的容错值,目前比较少用到;overallTolerance:设置整体的容错值,我们一般用这个来让该测试框架允许内容极其相似的图片通过测试;
如果您对其他的参数也感兴趣,请您自行结合官方文档进行理解。
总结
老实讲,动态缩放涉及到的东西其实不多,难度也不大。
相对于 VoiceOver 来说,Dynamic Type 的用户群体规模要大很多(对比过实际的数据)。尤其是现在年长的人越来越多,我们需要用行动来呵护好他们。让我们一起来共创和谐社会,哼哼哈嘿~
另外,如果您需要在 WebView 中支持动态缩放,您可以参考 Dynamic Type & In-App Font Scaling。请注意,这不是 Ficow 亲身实践过的内容,所以该资料仅供您参考。
参考内容:
Accessibility on iOS
Typography - Human Interface Guidelines
Dynamic Type & In-App Font Scaling
觉得不错?点个赞呗~
转载声明:本站文章如无特别说明,皆为原创。转载请注明:Ficow Shen's Blog
